It’s that moment after drinking great bottles of olive oil or fancy sparkling water when you simply can’t bear to dispose of the empty containers. Yeah, me too! My kitchen counter used to be a graveyard of interesting glass, each one whispering, “Don’t throw me away!” Each bottle held so much individuality that recycling them felt like a waste to me. My quest to transform useless objects into decorative home items started after I learned to repurpose old bottles into useful decorative objects. The process of transforming everyday objects into home decor is not only fulfilling but also easy to begin.
Why Give Those Glass Bottles a Second Life?
The act of repurposing glass bottles holds multiple wonderful advantages over recycling them. First off, it’s incredibly eco-friendly. The process of transforming bottles into new items decreases both the amount of recycling waste and eliminates the need for manufacturing fresh products. This minimal practice supports environmental sustainability and brings satisfaction from helping create a cleaner planet.
Secondly, it’s an amazing outlet for creativity. Your personal aesthetic shines through your handmade projects whether you choose rustic farmhouse or modern minimalist or bohemian chic styles. The uniqueness of each handcrafted piece makes every upcycled creation stand as a one-of-a-kind masterpiece. Home decor refreshment becomes affordable through this method. You can obtain breathtaking vases and candle holders at affordable prices instead of purchasing new expensive alternatives.
Gather Your Arsenal: Essential Tools and Materials
These basic materials should be prepared before starting our upcoming fun projects. Most of these materials exist in your craft drawer or can be obtained at a low cost without needing a professional workshop. These creative decor ideas maintain their approachable nature.
Safety First!
Working with glass requires the first priority to be safety. The projects do not require cutting but you should maintain awareness for safety purposes.
- Gloves: Take precautions for your hands especially when you deal with bottles that have rough edges.
- Well-ventilated Area: The use of spray paint or strong adhesives requires particular attention to ventilation standards.
- Newspaper or Drop Cloth: Protect your workspace from paint and any spills while maintaining a clean surface.
Your Basic Craft Stash
These materials should be in your possession for making various decorative glass bottle projects:
- Empty Glass Bottles: Wine bottles, soda bottles, jam jars, olive oil bottles—any shape or size! All bottles must be completely free of dust and dryness. To remove labels properly you should first soak them in hot soapy water before using an old credit card or Goo Gone for scraping.
- Paints: Acrylic craft paints, chalk paint, spray paint (glass-friendly if possible).
- Brushes: Various sizes for different effects.
- Twine, Jute, Yarn, or Rope: For wrapping and adding texture.
- Adhesives: Craft glue (PVA), hot glue gun (and glue sticks), spray adhesive.
- Decorations: Ribbons, beads, buttons, glitter, faux flowers, fairy lights, stencils, paint pens.
- Cleaning Supplies: Rubbing alcohol (for pre-paint wipe-down), dish soap.
Project 1: Elegantly Painted Bottles – A Splash of Color
This glass bottle craft stands as a basic yet powerful endeavor for anyone interested in glass decoration. Painted bottles instantly transform a space, whether you use them as standalone art pieces or to hold a single bloom. The basic upcycling technique produces attractive outcomes.
Step-by-Step: Solid Color Magic
A single solid coat of paint creates a modern aesthetic which works perfectly for a clean look. Chalk paint serves as an excellent choice because it bonds effectively to glass surfaces and produces a smooth matte finish.
- Prep Your Bottles: The bottles require a complete soap and water washing process. All stickers must be removed together with their adhesive backing. Let them dry completely. Rubbing alcohol provides a final cleaning step to eliminate all greasy fingerprints from the surface.
- Apply the First Coat: Apply a thin and uniform layer of acrylic or chalk paint to the surface using a brush. Full coverage should not be your goal for the initial coat because multiple thin applications create a smooth surface that resists drips. For spray painting operate the can in brief bursts from 6-8 inches distance by rotating the bottle.
- Dry and Repeat: Check paint instructions to determine drying times before applying your first coat. Use two or three coats of paint until you reach the desired level of opacity if necessary.
- Seal (Optional): Apply a clear sealant or varnish as a protective coating to your paint after it has fully cured especially when the bottle needs frequent handling. Your paint finish can be matched with either matte or gloss sealants.
- Decorate: The bottles remain ready for use after drying since you can add simple decorative elements such as ribbons or dried flowers or transform them into vases. The simple bottle decoration process results in beautiful glass bottles.
Adding Flair: Ombre, Stripes, and Dots
After understanding solid color techniques you should start experimenting. Begin ombre painting by applying your deepest color at the base then move to lighter shades towards the top while the paint is still wet. The base coat must dry before you use painter’s tape to create precise stripes on the bottle. A cotton swab or paintbrush back dipped in paint allows you to create dots by gently touching it against the bottle surface.
Project 2: Rustic Charm with Twine-Wrapped Bottles
People who love farmhouse style and bohemian tastes along with natural texture fans will find great success in wrapping their glass bottles with twine, jute or yarn. The wrapping process brings a stunning tactile quality which transforms the bottle into a completely new design.
Step-by-Step: Simple Twine Wrap
The process of twine wrapping becomes enjoyable after mastering the first few attempts. A great choice exists for building uniform sets of recycled glass containers.
- Clean Your Bottle: The bottle requires the same preparation as painting because it needs to be spotless and dry.
- Anchor Your Twine: Apply a small amount of strong craft glue or hot glue above the base of your bottle slightly above the bottom edge. Firmly insert the twine end into the glue patch.
- Start Wrapping: Begin wrapping the twine tightly around the bottle, working your way upwards. The application of thin glue lines should be placed one inch apart throughout the bottle to secure the twine during the process. The twine rows need to be pressed tightly against each other while maintaining no space between them.
- Continue Upwards: You should continue wrapping the bottle while applying glue periodically until you reach your desired height point. The bottle can be fully wrapped or you can choose to wrap only specific areas such as the neck or middle portion.
- Secure the End: Finish your work by applying glue at the end point then press the twine end firmly into it before trimming any remaining length.
- Embellish (Optional): The twine remains unchanged but you can enhance it by adding charms along with dried flowers or painting specific parts of the wrapped twine for a contrasting hue. The end result produces beautiful decorative centerpieces.
Variations: Mixed Textures and Colors
Don’t be afraid to mix things up! Try alternating sections of different colored yarn, or combine twine with a band of patterned fabric. After wrapping a section you can paint the exposed glass to achieve a unique layered design. The upcycling procedures provide unlimited opportunities to customize the final products.
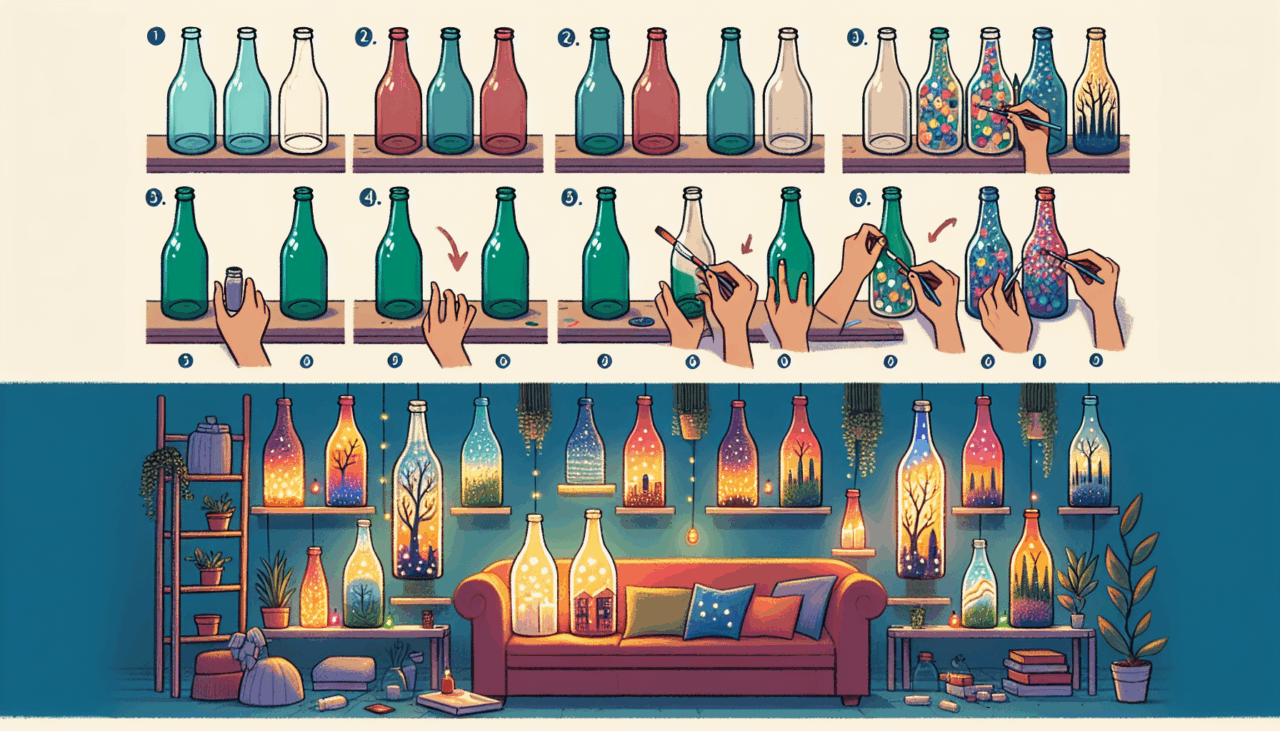
Project 3: Magical Fairy Light Bottles – Ambient Glow
Glass bottle upcycling leads to this enchanting outcome because it remains one of the most popular techniques. Fairy light bottles generate a warm and inviting illumination which makes them ideal for both home relaxation and outdoor events and adding a magical element to interior spaces.
Step-by-Step: Illuminating Your Decor
Battery-operated fairy lights are key here, as you don’t need an outlet for each bottle, offering more flexibility for placement.
- Clean and Dry: You guessed it! A clean, dry bottle is essential.
- Choose Your Lights: Opt for LED fairy lights on a thin copper wire. These are flexible, don’t heat up, and often come with a small battery pack that can be tucked away. Make sure the battery pack is small enough to fit through the bottle opening if you want it completely hidden, or simply secure it neatly on the outside.
- Insert the Lights: Carefully feed the string of fairy lights into the bottle. Start with the end opposite the battery pack and gently push them in. You can use a skewer or chopstick to arrange them inside if needed, spreading them out for an even glow.
- Position the Battery Pack: If the battery pack fits, gently push it inside the bottle opening. If not, you can secure it to the back of the bottle with a small piece of clear tape or command strip, or hide it behind other decor items.
- Switch On and Enjoy: Flip the switch on the battery pack, and watch your bottle transform into a beacon of warmth!
Enhancements: Frosted or Stained Glass Look
For an even softer, diffused glow, you can “frost” your bottle before adding the lights. Use frosted glass spray paint, or mix white acrylic paint with a little water and brush it on for a translucent effect. For a stained-glass look, use glass paints in various colors on the outside of the bottle, creating patterns or abstract designs. The light shining through will be truly stunning.
Beyond the Projects: Creative Decor Ideas and Display Tips
Once you’ve made your beautiful glass bottle decor, how do you display it? The possibilities are endless! Think about grouping bottles of different shapes and sizes together for visual interest. A collection of three or five often looks best.
- Vases: The most obvious use! Single stems, dried florals, or even small branches look amazing.
- Candle Holders: Taper candles fit perfectly into many wine bottle necks. Just make sure the flame is well away from any flammable decor.
- Centerpieces: A cluster of painted, wrapped, or lit bottles makes a fantastic centerpiece for dining tables, coffee tables, or mantelpieces.
- Shelf Styling: Add height and interest to bookshelves or open shelving.
- Outdoor Decor: Fairy light bottles are perfect for patio tables or hanging from trees (if you add a hanger).
- Gift Giving: A beautifully upcycled bottle makes a thoughtful, handmade gift for friends and family.
Don’t be afraid to experiment with different themes and seasons. A bottle wrapped in festive ribbon for the holidays, or a bright, painted one for summer, can truly refresh your home’s ambiance.
Your Upcycling Adventure Awaits!
I hope this journey through upcycling glass bottles has sparked some serious creative energy in you. It’s amazing what you can achieve with a little imagination and some forgotten glass. From sleek painted designs to rustic twine wraps and magical fairy light creations, the potential for repurposing glass bottles is truly limitless. So, next time you finish that bottle of sparkling cider, don’t just toss it! Clean it out, grab some craft supplies, and get ready to transform it into a unique piece of home decor. Happy crafting!