Hey there! I spent the other day pondering how to give your living space a fresh makeover without spending much money. My recent research uncovered various ideas which transformed my drab living room into a welcoming space. You will find budget-friendly techniques in this guide which help create personalized enjoyable spaces. Every individual from experienced craft enthusiasts to beginners seeking new experiences will discover useful concepts in this article.
Why Embrace Budget-Friendly Decoration?
Using a budget to renovate your living room space allows you to reimagine your space while expressing your individuality. You create a unique environment through your efforts that shares your personal story when you transform your space. The combination of simple techniques and affordable materials enables you to design a modern aesthetic that represents your individuality.
- Personal Touch: Every project reflects your personality, making the space truly yours.
- Cost Savings: Using repurposed items and affordable materials keeps expenses low.
- Creative Outlet: DIY projects let you experiment with colors, textures, and design styles.
Getting Started: Essential Tips and Tools
The first step to begin your new project requires you to collect every supply needed. Your room makeover process becomes easier with initial preparation when you want to repaint furniture or create new wall art or sew cushion covers. The lesson I learned demonstrates that preparing your project beforehand reduces both costs and duration.
Here are some must-have items for your next project:
- Basic Tools: Scissors, a hammer, a screwdriver, and nails.
- Art Supplies: Acrylic paint, brushes, and painter’s tape for clean edges.
- Decorative Elements: Fabric remnants, recycled jars, and old magazines for collages.
- Upcycling Materials: Old furniture can become beautiful statement pieces with a little effort.
Simple & Fun DIY Projects to Transform Your Space
Refreshing your living room gives you complete creative freedom to handle each project you take on. Here are some tried-and-true ideas to inspire you. I started my DIY journey by creating a wooden shelf that I hung on my wall which provided both storage and decorative appeal.
Upcycled Furniture
Nothing beats the charm of upcycled furniture. A fresh coat of paint along with sanding and new hardware can transform an old coffee table or dresser completely. The entire process delivers both entertaining results and sustainable outcomes for the environment.
- Steps: Clean your furniture thoroughly, sand the surface, and then apply primer. After applying your preferred color finish to the surface let it dry before you can reinstall any hardware.
- Highlight: Upcycling brings character and history back into every piece.
My first upcycled table became the topic of conversation at my social gathering so I felt delighted.
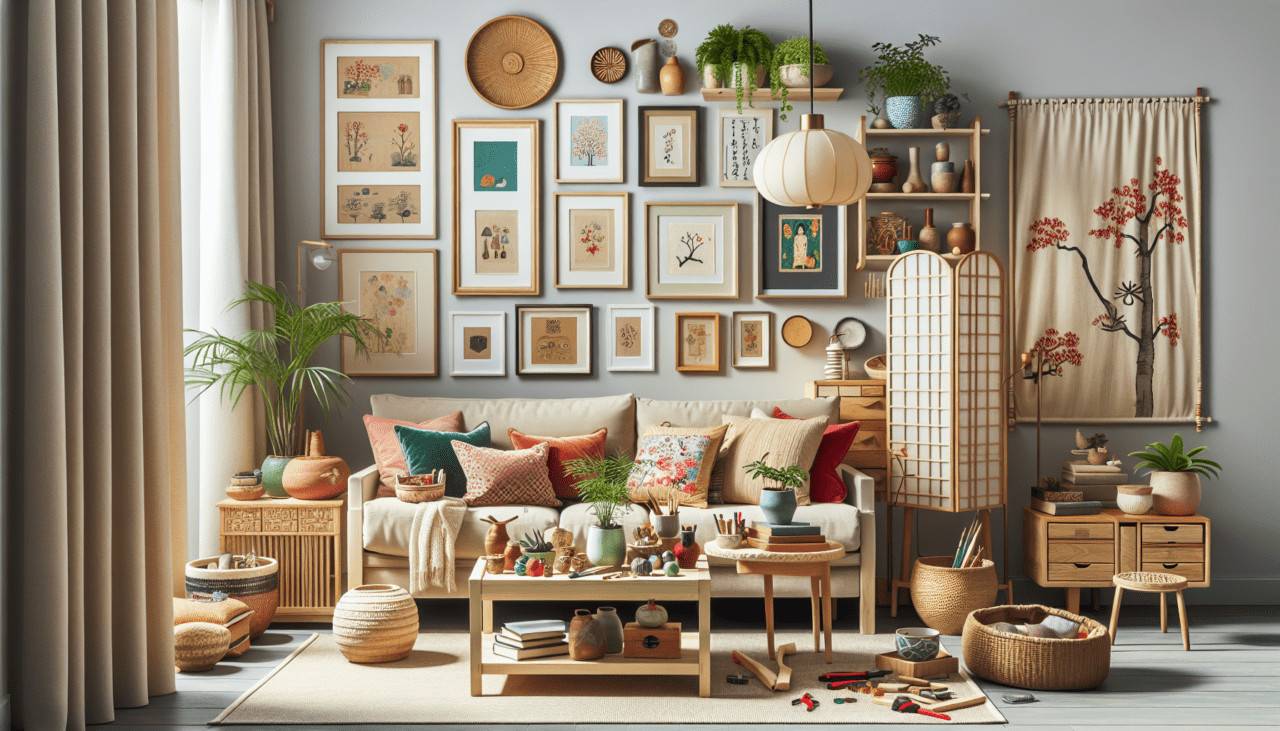
Creative Wall Art
Blank walls provide an ideal opportunity to express your artistic vision. Instead of buying expensive art, why not craft your own? I enjoy making collages using vintage postcards and fabric scraps because they add depth while providing texture to the artwork.
- Materials Needed: Frames, mod podge, and assorted materials like paper or fabric.
- How to Create: Arrange your materials on the wall, experiment with layouts before affixing anything permanently.
The project transformed my wall into something visually appealing while generating discussions about personal history.
Upgrading Soft Furnishings
Soft furnishings including cushions and curtains have the power to completely change how a room appears. You can easily DIY cushion re-covering by using affordable fabrics on existing cushions or creating completely new covers. My home received an energetic boost when I tried out tie-dye techniques in my decor.
- Why It Works: A fresh fabric pattern instantly refreshes the mood of the room, making it cozier and more inviting.
- Tip: Select colors that complement each other to establish a fun space by balancing deep colors with lighter shades for balanced harmony.
Decorative Lighting and Ambience
The appropriate choice of illumination will transform any room completely. Instead of purchasing expensive lighting equipment you should learn to create your own decorative lighting. During winter nights I created beautiful lanterns by combining mason jars with fairy lights which provided magical illumination.
Lighting Decor Materials
A few basic materials from craft stores together with mason jars and fairy lights are all you need to get started.
- What to Do: Collect mason jars, fairy lights, and a few extra items from local craft shops.
- DIY Tip: Use translucent materials like fabric or paper to create a diffused light effect.
Incorporating Nature into Your Living Space
The practice of bringing natural elements inside creates spaces that promote peace and renewal. Your living space will transform dramatically when you include potted plants or handmade terrariums or window herbs.
Introduction of Nature Elements to Living Spaces
Here’s how you introduce nature into your living environment:
- Indoor Plants: Succulents together with spider plants make excellent choices for first-time plant growers.
- Natural Accents: The decorative elements of your creations should include natural elements such as branches and pebbles and dried flowers.
- Reuse and Repurpose: Old jars make perfect homes for succulents and herbs which bring both functionality and aesthetic value to the space.
Color Schemes and Textural Elements
A room’s personality stands primarily on the selection of colors. You will discover great satisfaction through testing various color combinations between monochromatic schemes and colorful designs. The previous attempt with trendy pastel hues resulted in a soft dreamy atmosphere for my living room.
Project Planning for Your Timeline
The process of planning well maintains both your progress visibility and maintains a stress-free environment for your DIY work. My initial project planning involved creating a basic schedule because I needed to avoid feeling overwhelmed by the work ahead.
Project Timeline Planning
The following steps will assist you in managing your projects effectively:
Time Allocation for Projects
Set particular times during the day or evening for your DIY activities. The accumulation of short periods of work each day can produce remarkable outcomes.
Project Scheduling for Flexibility
Set aside additional time because creative projects naturally bring unexpected obstacles to your workflow.
Personal Stories and Inspiration
I experienced a moment where I became trapped in my current home design. A friend suggested trying different DIY living room projects to revive the area. My first project involved creating a handmade wall art piece before I began incorporating additional elements across weekly weekends. My living space benefited from the refreshing power of my projects which simultaneously strengthened my creative abilities and boosted my self-assurance.
A small amount of creativity creates new possibilities which you never believed existed. The process of completing a project requires its own set of obstacles yet each achievement provides value that surpasses the time spent working. The experience of completing these tasks has motivated me to maintain an experimental approach while sharing my findings with others. Such rewarding outcomes emerged from spending your Saturday working on craft projects without any expectation.
Step-by-Step Guide to Crafting a Statement Piece
This article provides a detailed tutorial about making a statement piece for your living room area. The project serves as a complete demonstration of creative and resourceful capabilities. The instructions will guide you toward developing a statement piece that will attract attention from everyone who sees it.
Materials and Preparation
To begin you need the following resources:
- Old wooden pallet or reclaimed wood pieces
- Acrylic paint in your favorite colors
- Painter’s tape
- Sandpaper
- Brushes and sponges
- Optional: Stencils or decoupage materials
First you need to assemble all materials before you begin with workspace cleaning and preparation. Place an old sheet or cardboard cover on the surfaces because it will shield them from accidents. A few minutes of planning now prevents disorderly situations from happening in the future.
Step 1: Prepare Your Wood Surface
Start by smoothing the wood surface through sanding. The removal of existing finishes creates a fresh base which becomes essential for designing your new project. Your artistic expression requires this slow process since it builds a solid foundation. The result will produce better results.
Step 2: Design Your Layout
Painter’s tape enables you to create your design layout while it helps draw geometric patterns and sectioned areas on the surface. Through this method you can express your creativity without compromising the clarity of your lines. I tried different shapes in my design before finding a modern and funky pattern which surprised me.
Step 3: Paint and Personalize
It’s time to add color! You can achieve interesting textures on your pallet by using acrylic paint with both brushes and sponges. You should wait for each coat to dry before moving on to the next application. Additional layers help deepen your design when needed.
Adding small motifs to your design using stencil techniques will give your space an adventurous touch if you feel bold. This project becomes more than decorating because it allows you to create your personal sanctuary.
Step 4: Finishing Touches
After paint completion you need to remove tape and examine your finished work. You should perform additional touch-ups while securing small decorations or implementing dried floral elements. Your final piece is ready to serve as your living room centerpiece.
Maximizing Impact with Clever Accessories
Accessories function as the essential core elements which bring every living room together. The combination of elements creates a curated appearance that transforms your space into a stylish environment. Your living space will gain sophistication through carefully selected combination of secondhand objects alongside homemade crafts along with reasonably priced decorative items.
- Mirrors: Light reflection through mirrors creates an illusion of expanded space and increased brightness in the room.
- Pillows and Throws: Try different patterns and textures to achieve a cozy atmosphere.
- Rugs: An appropriate rug serves to unite different components of a room into a harmonious whole.
Test different positions of items until you achieve a harmonious layout that gives you joy. The process of designing DIY living room projects allows you to create positive changes in your home while maintaining a positive attitude toward living room diy projects.
Eco-Friendly Ideas for a Conscious Home
The current design world focuses increasingly on environmentally friendly principles. Eco-friendly décor looks fashionable while protecting the planet through sustainable practices. Unique environmental-friendly pieces can be created from recycled materials such as old jars, newspapers and discarded fabrics.
- Upcycled Planters: Old tin cans and glass bottles become attractive plant containers through paint application or twine wrapping.
- Reclaimed Wood Décor: You can create decorative signs or picture frames or shelves using discarded wooden materials.
- Natural Textiles: Choose sustainable fabrics like organic cotton and recycled materials for creating new curtains and cushion covers.
The enjoyment of making eco-friendly projects stems from witnessing each finished product transform into something new. Your actions create dual benefits because they minimize waste while simultaneously establishing a positive example of innovative creativity that benefits your home and the planet.
Mixing Modern Trends with Classic Touches
Decorating homes means combining elements from various time periods along with design approaches. A dynamic appearance emerges when you combine modern edgy components with traditional timeless design elements. My attempts at combining modern shapes with vintage accessories showed me that excellent design exists beyond conventional boundaries.
A few tips include:
- Contrast Textures: Smooth glossy surfaces should be combined with hammered metal or chipped ceramics to create visual interest.
- Color Balance: You should combine modern strong hues with conventional monochromatic tones.
- Vintage Finds: The addition of historical objects such as antique timepieces together with retro lighting fixtures and handmade ceramic pieces will enhance your decor.
This blend creates an eclectic space that’s both nostalgic and fresh. The combination of different elements creates a deep aesthetic effect which produces fascinating visual effects.
Budget Home Decor Projects: Crafting with Confidence
The beginning of your DIY project can appear daunting yet every small achievement you make will strengthen your sense of confidence. The best method I use for project completion is dividing it into smaller workable sections. By handling one element at a time you will observe advancement and the excitement will continue. You will be amazed at how basic concepts evolve into meaningful transformations.
People who look for affordable do-it-yourself room decoration solutions should explore these options:
- Window Treatments: Replace heavy curtains with light, airy fabrics that catch the breeze.
- DIY Shelving: You can create decorative floating shelves from reclaimed wood which also provides storage functionality.
- Furniture Revamps: Paint or reupholster an old armchair to give it new character without spending a fortune.
Creating a Cohesive Look on a Shoestring Budget
Design ambitions typically become a concern for people who have limited funds. The actual fact shows that limitations actually create the most innovative solutions. Careful evaluation of each purchase leads you toward versatile items. Your new living space transforms into a beautifully arranged environment which smoothly moves from one area to another.
Below is a straightforward approach to achieve design consistency at reduced costs:
- Plan Ahead: Sketch a rough layout of your furniture and key accent pieces before shopping.
- Stick to a Color Palette: Use neutrals paired with one or two accent colors to maintain balance.
- Incorporate DIY Solutions: Rely on handmade touches for items like cushion covers and wall art. Some diy room decor for cheap solutions may surprise you because they blend style with personalized uniqueness.
Tips to Maintain Your Upgraded Living Room
After all your hard work, keeping the space looking great requires a bit of upkeep. A combination of regular dusting together with periodic accessory placement changes and occasional updates of paint or textiles maintains peak condition for your space. A tidy organized space both creates a welcoming atmosphere while providing daily emotional benefits.
- Weekly Check: Spend a few minutes each week tidying up surfaces to prevent clutter from building up.
- Seasonal Refreshes: Replace your accent pieces or rearrange your furniture based on seasonal preferences.
- Create a Routine: Performing small daily maintenance tasks produces substantial benefits. Maintaining projects looks new when you establish routines which include both window opening for fresh air and dusting off surfaces.
Overcoming DIY Challenges
Even the most enthusiastic DIYers face challenges. A paint spill once threatened to ruin a project until it forced me to develop patience alongside problem-solving abilities. DIY projects transform mistakes into alternative approaches which result in innovative ideas.
Here are some suggestions when you hit a snag:
- Take a Break: Step away for a little while. Your fresh perspective may discover answers which escaped you in your first examination.
- Ask for Help: Seek advice from friends or join online communities for assistance. People who share their experiences help each other find both functional solutions and emotional support.
- Embrace Imperfections: A minor imperfection can actually turn your project into something uniquely attractive.
Budget Living Room Transformation: A Real-Life Example
I decided to give my entire living room a complete transformation during the past few months. I focused on making small changes that made a big impact because my budget was restricted. An accent wall received paint while the coffee table received a new life through repurposing and handmade curtains were installed. These projects transformed the dull room into an active space that welcomes friends for both movie nights and board games.
Each project no matter its size provides an opportunity for self-expression. I understood that every misstep becomes both a triumph and an educational experience. The practical experience demonstrates that creativity becomes limitless when you combine enthusiasm with exploration.
Final Thoughts and Call-to-Action
The final goal of DIY home projects for your living room consists of building a personalized space that mirrors your identity while accommodating your life needs. The handmade pieces you create from your imagination will outshine commercial products no matter which DIY living room project you choose.
Begin your upcoming project today while taking a courageous step forward. Your living space needs a makeover which serves as the perfect opportunity to display your creativity. Each minor enhancement leads to cumulative change until you achieve a home atmosphere that belongs to you exclusively. Embark on these creative ideas while developing your artistic expression to build a house that represents your personal touch.
Share your personal stories or ask questions through the comments section if these ideas inspired you. I want to know about your space transformation experiences along with your creative approaches to decorating your home.
Happy crafting and here’s to many more creative adventures!